A 4000 × 3000 photo fills a 3:2 landscape print if you keep the width and trim about 333 pixels from the height. A centred trim removes roughly 167 pixels at either edge. That is easy to miss when the order preview shows the whole scene as a small thumbnail.
Try the crop on two marks
Open the scale drawing of the three print previews. Its square marks a detail 100 pixels below the top of the original. Its circle marks another detail 100 pixels above the bottom. They could be the tips of a hat and the bottom of a handwritten date. The positions are constructed for this example.
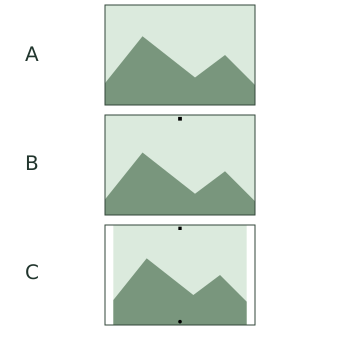
| Preview | Vertical range kept, from the top | Detail that survives |
|---|---|---|
| A. Fill, centred | About 167 to 2833 px | Neither mark |
| B. Fill, aligned to the top | 0 to about 2667 px | Square only |
| C. Fit, centred on paper | All 3000 px | Both marks |
The two marks are 2800 pixels apart. The crop is only about 2667 pixels high. You can slide it up or down, but no position will save both. This is a quick test before spending time nudging the frame. If only one detail matters, move the preview towards that detail and check that the whole object fits.
What border will you see on paper?
For a 6 × 4 inch landscape print, fitting the full photo at a height of 4 inches makes it 5⅓ inches wide. That leaves one third of an inch on each side if centred. In the drawing, this is the same as adding 250 pixels on each side of the original. Choose fit if both details matter. If the border is unacceptable, try paper with the original 4:3 ratio or choose a different source photo.
Once the crop is set, use the remaining pixel dimensions to work out the print size. Exporting a smaller copy as well? Check how many pixels survive the resize before saving it.
Read the final order preview at the chosen orientation. The diagram assumes exact paper dimensions and zero bleed; a lab may trim more at the edges. Keep a copy of the full original before saving a crop.
Original example inputs · Arithmetic checks for the original examples